Today’s tutorial isn’t one you might expect to be wedding related and it’s certainly not one that everyone’s going to want to try and create, but I just loved Kat Cameron‘s owls so much I had to share! I don’t know about you, but these really made me smile.
Over to you Kat, Wit Wooooo!

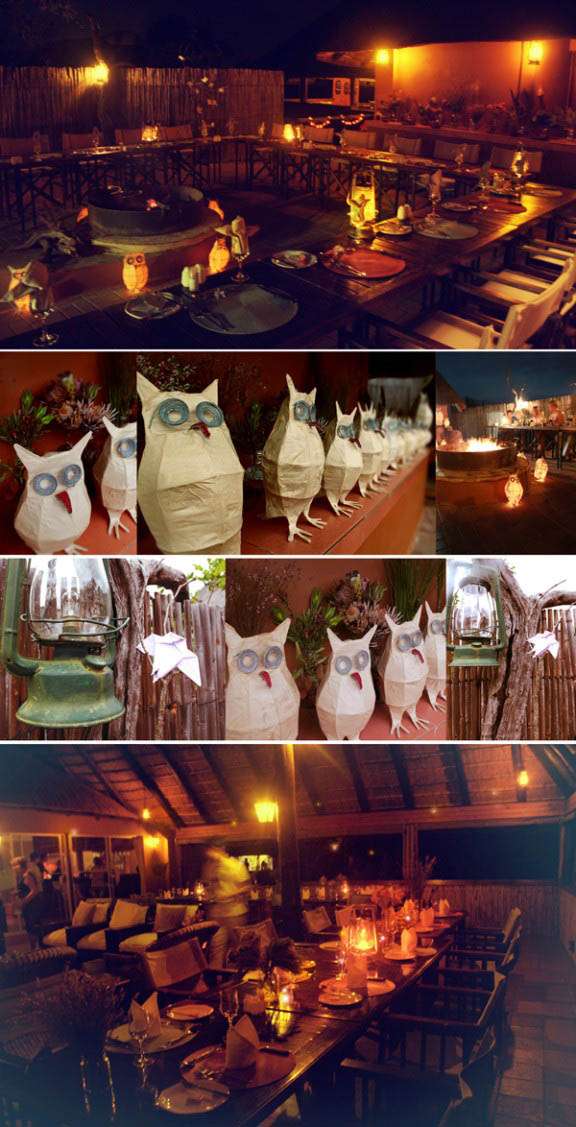
My whole wedding was owl themed. It all started when I drew two owls on a tandem bike for our wedding invites. I’m a bit of a bird geek and the owl theme continued and appeared as labels on wine as well as a limited edition print for each guest. My wedding was tiny with only 22 people, and we had a fantastic time in at the game reserve for 3 days of natural heaven.
Supplies Needed

2 types of metal wire -1 thin and flexible, the other thicker but also flexible
1 pair of pliers
Small coloured beads of your choosing (make sure they can be threaded onto the thin wire)
Wallpaper glue
Newsprint or tissue paper
Method
Step 1: Start by forming the outline shape of the owl, and joining the two ends of the wire by twisting a length of thin wire around both, securing them together.

Step 2: Attach a wire circle to the owl form, creating a 3 dimensional body and head. The number of “wire body circles” depends on the height of your owl. For mine, which was small, I created three.
Secure each ring to the owl frame with the thin bendy wire. Create “supports” by linking up the circles with other pieces of wire that run vertically, from the head down. You can create as many circles and supports as you like, the more you have, the more sturdy your owl will be. You can see in the larger owls made for my wedding that the body form had more wire structuring.

Step 3: Create the eyes by spiralling the ends of a length of wire and attaching it across the front of the owl’s face.

Step 4: To make the beak, bend some wire into a “v” shape, leaving a small length on each side. Thread the beads onto another length of thin wire, and weave it across the “v”. Attach the beak to the 1st circle of wire on the owl that forms its “neck”.

Step 5: Now that you have completed your wire owl framework (don’t forget to make a tail out of one of the wire supports!) you can begin to cover it in paper. Prepare your wallpaper glue by following the instructions on the packaging.

Step 6: Once you have the wallpaper glue ready, you can dip your paper in, soaking it, use your finger to scrape off excess glue and layer it over the owl frame.
Completely cover the owl, only leaving the eyes and beak exposed. Leave the owl to dry somewhere in the sun, or in a dry place. It may take a few hours, depending on how much paper you layered on, or how large your owl is. For a more even effect, spray paint your owls afterwards. This helps to smooth out any paper overlaps, which become very apparent when there is a candle glowing inside your owl.

Step 7: I think these owls look great on their own or as lanterns with candles inside. We placed candles in glasses filled with sand. It is also a good idea to poke holes behind the eyes, to allow the hot air to escape. It creates little glowing eyes, which is pretty cool. Take care when you are working with the candles, and never leave the lit owl unattended in a room. Always test your owl beforehand!

Step 8: And your’e done! Feel free to experiment, by adding on wings, and different shaped beaks. The owls were a big hit at the wedding, and they worked well as design elements during the night and day!
Kat is a freelance illustrator based in Barcelona. You can see more of her work on her website.